
CS144-Minnow Lab总结
![]()
个人感觉,虽然整个CS144的Lab难度不算特别大(认认真真做一周时间应该是够了),但还是非常有收获的。反正我做完就感觉死去的计网记忆在攻击我:(。难度排序的话,应该是 TCP Sender > TCP receiver ≈Network Interface > IP router > Webget & ByteStream。
0 Networking Warmup
lab0的前几个部分主要以使用命令进行发Http请求或邮件并观察响应为主,只有最后两个部分需要写代码。下面介绍一下我的环境以及配置方法。
WSL Install:
首先,在确保虚拟化以及WSL功能正确开启后,前往微软商店下载Windows Subsystem For Linux。我使用的发行版是Ubuntu 22.04.2 LTS。更详细的下载方法,可以查看我的另一篇博客[搭建自己的生产环境]中的WSL部分。
接着,在WSL下载cmake、make、git和clang-format。其中,cmake和make是用于项目构建和编译的;git则是用于版本管理;clang-format则是一个格式化工具。它都会在后续使用到。具体下载方法如下:
sudo apt install cmake make git clang-format
Remote Repository:
首先,在github中创建一个名为minnow的空仓库,作为我们的远程备份仓库。注意,为了遵守课程规定,我们需要将该仓库设为私有。
其次,克隆课程项目,并将其推送到自己的远程仓库上,完成仓库的初始化。具体方法如下:
# clone the bare git proj
git clone --bare https://github.com/cs144/minnow

# cd the bare git directory and push everything to your own repo
cd minnow.git; git remote add mine git@github.com:Zhytou/minnow.git
git push --all mine
git push --tags mine

# remove the bare git directory and see your own repo
rm -rf minnow.git
git clone git@github.com:Zhytou/minnow.git
Compile & Run:
CS144课程实验使用cmake构架和编译,方法如下:
cd minnow
# 编译
cmake -S . -B build
# 运行
cmake --build build --target check_Webget
Writing webget
这部分要求我们在apps/webget.cc里面实现void get_URL( const string& host, const string& path )函数,最终完成抓取网页并写入到标准输出的功能。
Socket:
这个任务在理解了套接字的通信流程之后就会变得非常简单。一个常见的客户端使用套接字向服务器发送信息的API调用顺序如下:
- 首先,服务器创建一个套接字,并使用bind将其绑定到某IP和端口,接着使用listen使其监听该端口的连接请求。
- 接着,客户端创建一个套接字,并使用connect尝试连接服务器。成功后,使用send向其发送请求。
- 此时,服务器介绍到客户端请求,使用accept得到一个新套接字,先使用recv读取请求,接着使用send发送回复。
- 接着,客户端使用recv接收到回复,使用close关闭连接。
- 最后,服务器使用close关闭连接。
此外,还需要注意的就是在写Http请求时,换行是\r\n。
void get_URL( const string& host, const string& path )
{
  TCPSocket sock;
  Address addr( host, "http" );
  sock.connect( addr );
  sock.write( "GET " + path + " HTTP/1.1\r\n" );
  sock.write( "Host: " + host + " \r\n" );
  sock.write( "Connection: close \r\n\r\n" );
  string buf;
  do {
    sock.read( buf );
    if ( buf.empty() ) {
      break;
    } else {
      cout << buf;
    }
  } while ( 1 );
}
Test Results:
zhytou@LAPTOP-Q0M4I2VQ:~/minnow/build$ make check_webget
Test project /home/zhytou/minnow/build
    Start 1: compile with bug-checkers
1/2 Test #1: compile with bug-checkers ........   Passed    0.17 sec
    Start 2: t_webget
2/2 Test #2: t_webget .........................   Passed    1.21 sec

100% tests passed, 0 tests failed out of 2

Total Test time (real) =   1.38 sec
Built target check_webget
An in-memory reliable byte stream
这个部分要求我们在src/byte_stream.hh和src/byte_stream.cc文件中,完成ByteStream以及其派生类接口,实现可以读写的字节流。
ByteStream Data Structure:
我一开始想到使用队列作为底层数据结构来实现这个类,但后面考虑到其派生类Reader中的peek接口要求返回string_view类型,于是便使用字符串作为底层结构实现。
因为,如果使用队列作为实际存储数据的结构,在实现peek时必然会使用一个临时字符串存储队列中数据,并使用这个字符串构造string_view返回。这样一定会报错,因为string_view只是一种只读的字符串视图,它并没有这段内存的所有权,所以在返回后临时字符串被销毁,那么就会有string_view悬空引用和访问无效内存的问题。
class ByteStream
{
protected:
  uint64_t capacity_;
  std::string buffer_;
  bool is_closed_;
  bool has_error_;
  uint64_t bytes_pushed_;
  uint64_t bytes_popped_;

public:
  // ...
};
Test Results:
zhytou@LAPTOP-Q0M4I2VQ:~/minnow/build$ make check0
Test project /home/zhytou/minnow/build
      Start  1: compile with bug-checkers
 1/10 Test  #1: compile with bug-checkers ........   Passed    0.17 sec
      Start  2: t_webget
 2/10 Test  #2: t_webget .........................   Passed    1.21 sec
      Start  3: byte_stream_basics
 3/10 Test  #3: byte_stream_basics ...............   Passed    0.01 sec
      Start  4: byte_stream_capacity
 4/10 Test  #4: byte_stream_capacity .............   Passed    0.01 sec
      Start  5: byte_stream_one_write
 5/10 Test  #5: byte_stream_one_write ............   Passed    0.01 sec
      Start  6: byte_stream_two_writes
 6/10 Test  #6: byte_stream_two_writes ...........   Passed    0.01 sec
      Start  7: byte_stream_many_writes
 7/10 Test  #7: byte_stream_many_writes ..........   Passed    0.03 sec
      Start  8: byte_stream_stress_test
 8/10 Test  #8: byte_stream_stress_test ..........   Passed    0.01 sec
      Start 37: compile with optimization
 9/10 Test #37: compile with optimization ........   Passed    3.98 sec
      Start 38: byte_stream_speed_test
             ByteStream throughput: 6.56 Gbit/s
10/10 Test #38: byte_stream_speed_test ...........   Passed    0.07 sec

100% tests passed, 0 tests failed out of 10

Total Test time (real) =   5.49 sec
Built target check0
1 Stitching Substrings Into A Byte Stream
lab1要求实现一个名为Reassembler的整合器类。它能够将乱序传入且可能重叠的字符串排序并输出到给定的字节流中,其结构如下图:
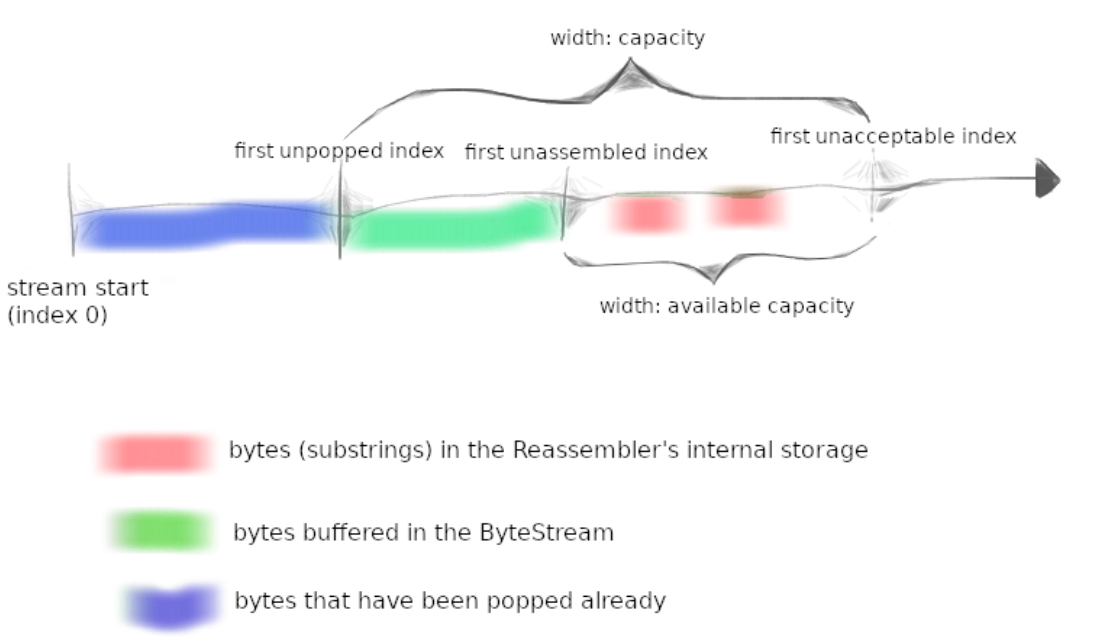
其中,最重要的一点是ByteStream中未读取的部分加上Reassembler中无序的部分大小不能超过整个capacity。
Reassembler Data Structure:
Reassembler中最关键的一点就是如何临时存储可能重叠的字符串。我选择的是使用map<uint64_t, char>来存储,有一点滑动窗口的思想。可能更常规的做法是用map<uint64_t, string>来存储,但我考虑到重叠的字符串可能会导致维护这个字典的逻辑变得比较复杂,索性直接使用索引到字符的映射,让维护的逻辑变得非常简单。但这样做会导致效率严重下降(test13有可能超时)。Reassembler的定义如下:
class Reassembler
{
private:
  // Bytes stored temorarily in ther Reassembler whose indexes are in the available capacity
  std::map<uint64_t, char> sliding_window_;
  // The index of next byte expected to write in the outbounded stream
  uint64_t expected_index_;
  // The index of last byte expected to write in the outbounded stream
  uint64_t expected_last_index_;

public:
  // ...
};
Putting Substrings In Sequence:
按前面的思路,Reassembler::insert函数的框架就应该包括:
- 处理传入的字符串
- 紧随expected_index_的直接写入输出字节流
- 超出容量的直接丢弃
- 其余的存入sliding_window_
- 检测暂存的字符串是否能够写入
- 判断整合是否结束
void Reassembler::insert( uint64_t first_index, string data, bool is_last_substring, Writer& output )
{
  if ( first_index <= expected_index_ && first_index + data.size() > expected_index_ ) {
    // if the part of substr lies just behind the expected index, push it to the output
    // be careful to update the expected index with the actual written size
  } else if ( first_index + data.size() > expected_index_
              && first_index < expected_index_ + output.available_capacity() ) {
    // if part of the substr lies in the availabe capacity, add it to the sliding window
    // be careful that the size of sliding window cannot exceed the available capacity of output stream
    for ( uint64_t i = 0; i < data.size() && first_index + i < expected_index_ + output.available_capacity();
          i++ ) {
      // ...
    }
  }

  // erase elements which are already written and check if there are any elements which can be written
  string old_data;
  for ( auto itr = sliding_window_.begin();
        itr != sliding_window_.end() && itr->first <= expected_index_ + old_data.size();
        itr = sliding_window_.erase( itr ) ) {
    // ...
  }

  // set the expected last index if the substr is the last one
  if ( is_last_substring ) {
    expected_last_index_ = first_index + data.size();
  }
  // when the last expected byte is inserted and the sliding window is empty, close the output
  if ( expected_index_ == expected_last_index_ && sliding_window_.empty() ) {
    output.close();
  }

  return;
}
Test Results:
zhytou@LAPTOP-Q0M4I2VQ:~/minnow/build$ make check1
Test project /home/zhytou/minnow/build
      Start  1: compile with bug-checkers
 1/17 Test  #1: compile with bug-checkers ........   Passed    0.22 sec
      Start  3: byte_stream_basics
 2/17 Test  #3: byte_stream_basics ...............   Passed    0.01 sec
      Start  4: byte_stream_capacity
 3/17 Test  #4: byte_stream_capacity .............   Passed    0.01 sec
      Start  5: byte_stream_one_write
 4/17 Test  #5: byte_stream_one_write ............   Passed    0.01 sec
      Start  6: byte_stream_two_writes
 5/17 Test  #6: byte_stream_two_writes ...........   Passed    0.01 sec
      Start  7: byte_stream_many_writes
 6/17 Test  #7: byte_stream_many_writes ..........   Passed    0.03 sec
      Start  8: byte_stream_stress_test
 7/17 Test  #8: byte_stream_stress_test ..........   Passed    0.01 sec
      Start  9: reassembler_single
 8/17 Test  #9: reassembler_single ...............   Passed    0.01 sec
      Start 10: reassembler_cap
 9/17 Test #10: reassembler_cap ..................   Passed    0.01 sec
      Start 11: reassembler_seq
10/17 Test #11: reassembler_seq ..................   Passed    0.01 sec
      Start 12: reassembler_dup
11/17 Test #12: reassembler_dup ..................   Passed    0.02 sec
      Start 13: reassembler_holes
12/17 Test #13: reassembler_holes ................   Passed    0.01 sec
      Start 14: reassembler_overlapping
13/17 Test #14: reassembler_overlapping ..........   Passed    0.01 sec
      Start 15: reassembler_win
14/17 Test #15: reassembler_win ..................   Passed    5.64 sec
      Start 37: compile with optimization
15/17 Test #37: compile with optimization ........   Passed    0.08 sec
      Start 38: byte_stream_speed_test
             ByteStream throughput: 6.30 Gbit/s
16/17 Test #38: byte_stream_speed_test ...........   Passed    0.07 sec
      Start 39: reassembler_speed_test
             Reassembler throughput: 14.16 Gbit/s
17/17 Test #39: reassembler_speed_test ...........   Passed    0.11 sec

100% tests passed, 0 tests failed out of 17

Total Test time (real) =   6.26 sec
Built target check1
2 The TCP Receiver
Translating Between 64-bit Indexes And 32-bit Seqnos:
在TCP报文中只能够提供一个32位的区域用于存储报文序号。当报文序号超过这个范围时,序号字段将循环回零重新计数。换句话说,TCP报文中的序号只是一个相对序号。
在实际通信中,发送者会随机初始化一个32位的起始报文序号(Initial Sequence Number,ISN),并告知接收者。此时,接收者就可以通过将报文中的相对序号(Sequence Number,seqno)与起始序号相加的方式获取实际的绝对序号(Absolute Sequence Number)。这三者的关系如下:

lab2在第一部分中,假设报文的绝对序号不会超过64位数表示范围,并要求实现一个用于32位数和64位数转换的一个Wrap32类。
这部分个人认为比较简单,对于wrap函数来说,直接将64位数截断就好了;对于unwrap函数来说,将相对序号不断加1 « 32直到接近检查点就好了。不过要注意一些特殊情况,比如检查点特别小等。
Receiving Bytes:
lab2第二部分要求实现TCPReceiver类,完成其中receive和send接口。我觉得其中最大的难点就是维护下一次希望发送的序号。尤其是要针对一些边界情况,比如,收到多个SYN或收到FIN但不能关闭等等。
因此,我在TCPReceiver类中添加了ack_seqno_用于记录下一次希望发送的序号(如果使用inbound_stream.bytes_pushed(),则面对SYN未发送或第一次发送的逻辑会比较复杂)、is_connected_用于记录是否开启连接(避免重复SYN)以及isn_记录第一个报文序号。具体如下:
class TCPReceiver
{
private:
  // The flag indicating whether the receiver is connected
  bool is_connected_;
  // The next sequence number expected from the sender
  uint64_t ack_seqno_;
  // The initial sequence number of the sender
  Wrap32 isn_;

public:
   // ...
};
有了ack_seqno_记录的下一次希望发送的序号,send函数就非常简单了,只需要将其放入Wrap32中返回即可。
TCPReceiverMessage TCPReceiver::send( const Writer& inbound_stream ) const
{
  TCPReceiverMessage message;
  // get the window size
  if ( inbound_stream.available_capacity() > UINT16_MAX ) {
    message.window_size = UINT16_MAX;
  } else {
    message.window_size = inbound_stream.available_capacity();
  }
  // get the ackno, only if receiver is connected
  if ( is_connected_ ) {
    message.ackno = Wrap32::wrap( ack_seqno_, isn_ );
  }
  return message;
}
至于receive函数,它要考虑的就多一些了,主要还是一些特殊情况,其框架如下:
void TCPReceiver::receive( TCPSenderMessage message, Reassembler& reassembler, Writer& inbound_stream )
{
  if ( message.SYN ) {
    if ( is_connected_ ) {
      // avoid duplicate connections
      return;
    }
    // beginning of the byte stream
    is_connected_ = true;
    // keep track of initial sequence number
    isn_ = message.seqno;
    // ack seqno must be at least 1, because receiving SYN
    ack_seqno_ = 1;
  }

  // transmission doesn't begin, do nothing
  if ( is_connected_ == false ) {
    return;
  }

  // convert relative seqno to absolute seqno, checkpoint is the bytes written to the stream
  uint64_t absolute_seqno = message.seqno.unwrap( isn_, inbound_stream.bytes_pushed() );
  // extract the data from the tcp payload, be careful to use Buffer::release()
  string data( message.payload );

  // absolute seqno begin at 0 when SYN comes, so the actual starting index of data has to minus 1
  if ( absolute_seqno == 0 ) {
    if ( !message.SYN ) {
      // avoid invalid absolute seqno which equals to 0 but not SYN
      return;
    }
    reassembler.insert( 0, data, message.FIN, inbound_stream );
  } else {
    reassembler.insert( absolute_seqno - 1, data, message.FIN, inbound_stream );
  }

  // update ack seqno
  // ack seqno is the next expected byte, because SYN has to occupy 0
  if ( reassembler.index_expected() > 0 ) {
    ack_seqno_ = reassembler.index_expected() + 1;
  }
  // if the last byte is received, ack seqno should be added by 1 because FIN is not counted
  if ( reassembler.last_index_expected() == reassembler.index_expected() ) {
    ack_seqno_ += 1;
  }

  return;
}
Test Results:
zhytou@LAPTOP-Q0M4I2VQ:~/minnow/build$ make check2
Test project /home/zhytou/minnow/build
      Start  1: compile with bug-checkers
 1/29 Test  #1: compile with bug-checkers ........   Passed    0.21 sec
      Start  3: byte_stream_basics
 2/29 Test  #3: byte_stream_basics ...............   Passed    0.01 sec
      Start  4: byte_stream_capacity
 3/29 Test  #4: byte_stream_capacity .............   Passed    0.01 sec
      Start  5: byte_stream_one_write
 4/29 Test  #5: byte_stream_one_write ............   Passed    0.01 sec
      Start  6: byte_stream_two_writes
 5/29 Test  #6: byte_stream_two_writes ...........   Passed    0.01 sec
      Start  7: byte_stream_many_writes
 6/29 Test  #7: byte_stream_many_writes ..........   Passed    0.03 sec
      Start  8: byte_stream_stress_test
 7/29 Test  #8: byte_stream_stress_test ..........   Passed    0.01 sec
      Start  9: reassembler_single
 8/29 Test  #9: reassembler_single ...............   Passed    0.01 sec
      Start 10: reassembler_cap
 9/29 Test #10: reassembler_cap ..................   Passed    0.01 sec
      Start 11: reassembler_seq
10/29 Test #11: reassembler_seq ..................   Passed    0.01 sec
      Start 12: reassembler_dup
11/29 Test #12: reassembler_dup ..................   Passed    0.02 sec
      Start 13: reassembler_holes
12/29 Test #13: reassembler_holes ................   Passed    0.01 sec
      Start 14: reassembler_overlapping
13/29 Test #14: reassembler_overlapping ..........   Passed    0.01 sec
      Start 15: reassembler_win
14/29 Test #15: reassembler_win ..................   Passed    5.89 sec
      Start 16: wrapping_integers_cmp
15/29 Test #16: wrapping_integers_cmp ............   Passed    0.01 sec
      Start 17: wrapping_integers_wrap
16/29 Test #17: wrapping_integers_wrap ...........   Passed    0.01 sec
      Start 18: wrapping_integers_unwrap
17/29 Test #18: wrapping_integers_unwrap .........   Passed    0.00 sec
      Start 19: wrapping_integers_roundtrip
18/29 Test #19: wrapping_integers_roundtrip ......   Passed    0.29 sec
      Start 20: wrapping_integers_extra
19/29 Test #20: wrapping_integers_extra ..........   Passed    0.05 sec
      Start 21: recv_connect
20/29 Test #21: recv_connect .....................   Passed    0.01 sec
      Start 22: recv_transmit
21/29 Test #22: recv_transmit ....................   Passed    0.17 sec
      Start 23: recv_window
22/29 Test #23: recv_window ......................   Passed    0.01 sec
      Start 24: recv_reorder
23/29 Test #24: recv_reorder .....................   Passed    0.01 sec
      Start 25: recv_reorder_more
24/29 Test #25: recv_reorder_more ................   Passed    9.54 sec
      Start 26: recv_close
25/29 Test #26: recv_close .......................   Passed    0.01 sec
      Start 27: recv_special
26/29 Test #27: recv_special .....................   Passed    0.01 sec
      Start 37: compile with optimization
27/29 Test #37: compile with optimization ........   Passed    0.07 sec
      Start 38: byte_stream_speed_test
             ByteStream throughput: 6.51 Gbit/s
28/29 Test #38: byte_stream_speed_test ...........   Passed    0.07 sec
      Start 39: reassembler_speed_test
             Reassembler throughput: 16.55 Gbit/s
29/29 Test #39: reassembler_speed_test ...........   Passed    0.10 sec

100% tests passed, 0 tests failed out of 29

Total Test time (real) =  16.62 sec
Built target check2
3 The TCP Sender
lab3要求实现一个名为TCPSender的类,尽可能的向接收者发送字节,并通过超时重传保证可靠性。
Sending Bytes:
关于发送数据必须要说明的是,在lab3中,发送包是通过测试者调用TCPSender::maybe_send函数,而非发送者主动发送。换句话说,只需要将需要发送的包存储在一个队列,每次调用TCPSender::maybe_send时,弹出队首的包即可。
Recording Time:
此外,lab3中也不允许使用其他计时器记录时间,而是依靠TCPSender::tick函数,由测试者告诉发送者已经过去的时间长短。因此,TCPSender只需要使用一个变量存储传入的时间即可。
Keep Track Of Outstanding Segments and Resend Them After RTO:
TCP是一种面向流的可靠协议。为了保证其可靠传输,设计者在TCP中添加了许多机制,比如:校验和、滑动窗口和超时重传等等。lab3要求追踪未承认段(Outstanding Segments),并在超出重传时间(Retrasmission Timeout,RTO)后将RTO翻倍后,再次发送。因此,TCPSender需要一个记录未承认段的表以及一个记录当前重传时间的变量。
TCPSender Data Structure:
class TCPSender
{
  // initial SYN sequence number.
  Wrap32 isn_;
  // initial RTO. It stays the same all the time
  uint64_t initial_RTO_ms_;
  // current RTO. When retransmission fails, double it
  uint64_t RTO_ms_;
  // retransmission timer which records how long it has been since last retransmission happened.
  uint64_t timer_;
  // consecutive retransmission times.
  uint64_t crt_times_;
  // receiver's acknowledged absolute sequence number.
  uint64_t ackno_;
  // receiver's window size.
  uint64_t wind_size_;
  // sender's absolute sequence number
  uint64_t seqno_;
  // segments which are waiting to be sent.
  std::queue<TCPSenderMessage> segments_;
  // sender's sliding window shows all segments which haven't been acknowledged yet.
  std::map<uint64_t, TCPSenderMessage> outstanding_segments_;
  // sender's working mode
  bool running_;

public:
  // ...
};
Push Bytes To Outbound Stream:
在完成了TCPSender的数据结构之后,就需要实现其最核心的接口,也就是发送数据的TCPSender::push函数。其实,这个函数的核心就是根据收到接收者的ackno_和wind_size来构造发送请求,并将这个包放入segments_和outstanding_segments_。只不过,它还需要考虑一些边界情况,包括:
- 对于非发送者初始化而是接收者明确指出的
wind_size为0时,将wind_size当作1。 - 何时将FIN置为真?仅当输出流结束,且接收者滑动窗口还有空间才写入(因为FIN要占序号)。
总的来说,其大致流程如下:
void TCPSender::push( Reader& outbound_stream )
{
  while ( ( ( wind_size_ == 0 && seqno_ == ackno_ ) || seqno_ < ackno_ + wind_size_ ) && running_ ) {
    // construct sender message
    TCPSenderMessage msg;
    string data;
    uint64_t data_len = 0;

    if ( seqno_ == 0 ) {
      // SYN
      msg.SYN = true;
    }
    msg.seqno = Wrap32::wrap( seqno_, isn_ );

    // use [ackno_, ackno_ + wind_size_) to calculate data_len
    if ( ackno_ + wind_size_ > seqno_ ) {
      // the actual length of seqno for payload has to minus 1, if SYN = true
      data_len = ackno_ + wind_size_ - seqno_ - msg.SYN;
    }
    // make sure data len is in this range [1, MAX_PAYLOAD_SIZE), even if the receiver's window size is 0
    data_len = max( 1UL, min( data_len, TCPConfig::MAX_PAYLOAD_SIZE ) );
    read( outbound_stream, data_len, data );
    msg.payload = Buffer( std::move( data ) );

    // if stream is finished and there is also space in receiver's window, set the FIN flag
    // or if stream is finished and the window size is 0 and the data is empty and SYN flag is false, set the FIN
    // flag otherwise put FIN in another separate message
    if ( outbound_stream.is_finished()
         && ( seqno_ + msg.sequence_length() < ackno_ + wind_size_
              || ( wind_size_ == 0 && msg.sequence_length() == 0 ) ) ) {
      // FIN
      msg.FIN = true;
    }

    // quit sending if msg is empty
    if ( msg.sequence_length() == 0 ) {
      return;
    }

    // add it to the waiting queue. When maybe_send() is called, sender will send the first segment in the queue.
    segments_.push( msg );
    // keep track of the segment
    outstanding_segments_.emplace( seqno_, msg );

    // update sender's seqno
    seqno_ += msg.sequence_length();

    // only allow to send 1 byte by pretending window size equals to 1, when the actual size is 0
    if ( wind_size_ == 0 ) {
      break;
    }

    // no more segments
    if ( msg.FIN ) {
      running_ = false;
      break;
    }
  }
  return;
}
Receive ACK Message:
完成发送接口之后,就需要实现接收接口了。事实上,TCPSender::receive与TCPSender::push重要性相同。因为它决定了ackno_和wind_size的更新,并且还囊括了超时重发的逻辑。其核心功能包括:
- 更新
ackno_和wind_size; - 更新
outstanding_segments_; - 如果发送了重发,将
RTO_ms_翻倍,并更新crt_times_; - 反之,则重置
RTO_ms_、crt_times_以及timer_。
总之,我的实现如下:
void TCPSender::receive( const TCPReceiverMessage& msg )
{
  uint64_t new_ackno = ackno_;
  if ( msg.ackno.has_value() ) {
    // extract receiver's ackno
    new_ackno = msg.ackno.value().unwrap( isn_, ackno_ );
    // avoid invalid ackno which is smaller
    if ( ackno_ > new_ackno ) {
      return;
    }
  }
  // set receiver's window size, even if new_ackno equals to ackno
  wind_size_ = msg.window_size;
  // update outstanding segments, remove those acknowledged by receiver
  bool reset_flag = false;
  for ( auto itr = outstanding_segments_.begin(); itr != outstanding_segments_.end(); itr++ ) {
    if ( itr->first + itr->second.sequence_length() == new_ackno ) {
      reset_flag = true;
      outstanding_segments_.erase( outstanding_segments_.begin(), ++itr );
      break;
    }
  }
  // make sure the new ackno is valid
  if ( !reset_flag ) {
    return;
  }
  // update ackno
  ackno_ = new_ackno;

  // the test system will call push again to send the rest bytes after calling receive
  // treat a 0 window size as equal to 1 but don't back off RTO
  if ( wind_size_ == 0 ) {
    return;
  }

  // reset RTO
  RTO_ms_ = initial_RTO_ms_;
  // reset retransmission timer
  timer_ = 0;
  // reset times of consecutive retransmissions
  crt_times_ = 0;
}
Test Results:
zhytou@LAPTOP-Q0M4I2VQ:~/minnow/build$ make check3
Test project /home/zhytou/minnow/build
      Start  1: compile with bug-checkers
 1/36 Test  #1: compile with bug-checkers ........   Passed    0.18 sec
      Start  3: byte_stream_basics
 2/36 Test  #3: byte_stream_basics ...............   Passed    0.01 sec
      Start  4: byte_stream_capacity
 3/36 Test  #4: byte_stream_capacity .............   Passed    0.01 sec
      Start  5: byte_stream_one_write
 4/36 Test  #5: byte_stream_one_write ............   Passed    0.01 sec
      Start  6: byte_stream_two_writes
 5/36 Test  #6: byte_stream_two_writes ...........   Passed    0.01 sec
      Start  7: byte_stream_many_writes
 6/36 Test  #7: byte_stream_many_writes ..........   Passed    0.03 sec
      Start  8: byte_stream_stress_test
 7/36 Test  #8: byte_stream_stress_test ..........   Passed    0.01 sec
      Start  9: reassembler_single
 8/36 Test  #9: reassembler_single ...............   Passed    0.01 sec
      Start 10: reassembler_cap
 9/36 Test #10: reassembler_cap ..................   Passed    0.01 sec
      Start 11: reassembler_seq
10/36 Test #11: reassembler_seq ..................   Passed    0.01 sec
      Start 12: reassembler_dup
11/36 Test #12: reassembler_dup ..................   Passed    0.02 sec
      Start 13: reassembler_holes
12/36 Test #13: reassembler_holes ................   Passed    0.01 sec
      Start 14: reassembler_overlapping
13/36 Test #14: reassembler_overlapping ..........   Passed    0.01 sec
      Start 15: reassembler_win
14/36 Test #15: reassembler_win ..................   Passed    5.61 sec
      Start 16: wrapping_integers_cmp
15/36 Test #16: wrapping_integers_cmp ............   Passed    0.01 sec
      Start 17: wrapping_integers_wrap
16/36 Test #17: wrapping_integers_wrap ...........   Passed    0.00 sec
      Start 18: wrapping_integers_unwrap
17/36 Test #18: wrapping_integers_unwrap .........   Passed    0.00 sec
      Start 19: wrapping_integers_roundtrip
18/36 Test #19: wrapping_integers_roundtrip ......   Passed    0.28 sec
      Start 20: wrapping_integers_extra
19/36 Test #20: wrapping_integers_extra ..........   Passed    0.05 sec
      Start 21: recv_connect
20/36 Test #21: recv_connect .....................   Passed    0.01 sec
      Start 22: recv_transmit
21/36 Test #22: recv_transmit ....................   Passed    0.16 sec
      Start 23: recv_window
22/36 Test #23: recv_window ......................   Passed    0.01 sec
      Start 24: recv_reorder
23/36 Test #24: recv_reorder .....................   Passed    0.01 sec
      Start 25: recv_reorder_more
24/36 Test #25: recv_reorder_more ................   Passed    9.01 sec
      Start 26: recv_close
25/36 Test #26: recv_close .......................   Passed    0.01 sec
      Start 27: recv_special
26/36 Test #27: recv_special .....................   Passed    0.01 sec
      Start 28: send_connect
27/36 Test #28: send_connect .....................   Passed    0.01 sec
      Start 29: send_transmit
28/36 Test #29: send_transmit ....................   Passed    0.30 sec
      Start 30: send_retx
29/36 Test #30: send_retx ........................   Passed    0.01 sec
      Start 31: send_window
30/36 Test #31: send_window ......................   Passed    0.06 sec
      Start 32: send_ack
31/36 Test #32: send_ack .........................   Passed    0.01 sec
      Start 33: send_close
32/36 Test #33: send_close .......................   Passed    0.02 sec
      Start 34: send_extra
33/36 Test #34: send_extra .......................   Passed    0.03 sec
      Start 37: compile with optimization
34/36 Test #37: compile with optimization ........   Passed    0.07 sec
      Start 38: byte_stream_speed_test
             ByteStream throughput: 5.47 Gbit/s
35/36 Test #38: byte_stream_speed_test ...........   Passed    0.07 sec
      Start 39: reassembler_speed_test
             Reassembler throughput: 17.48 Gbit/s
36/36 Test #39: reassembler_speed_test ...........   Passed    0.11 sec

100% tests passed, 0 tests failed out of 36

Total Test time (real) =  16.17 sec
Built target check3
4 The Network Interface
lab4要求实现一个名为NetworkInterface的类,即:链路层接口。其主要工作就是发送和接受数据帧。具体来在lab4中,其发送流程为将IP协议数据包封装为Ethernet数据帧,并根据IP地址找到对应的Ethernet接口;而接受流程则为接收Ethernet数据帧并根据帧内容回复。
The Address Resolution Protocol:
由于NetworkInterface需要根据IP地址找到对应的Ethernet地址,这就表明它必须依靠某种机制获取未知设备的物理地址,并在内部存储该映射。
而这个根据IP地址获取MAC地址的机制被称作地址解析协议(Address Resolution Protocol,ARP)。它的原理是,设备向网络中的其他设备发送ARP请求,询问某个IP地址对应的MAC地址。收到请求的设备检查自己的ARP缓存表,如果有对应的条目,则返回已知的MAC地址;如果没有对应条目,则广播ARP请求到局域网上的所有设备。拥有被请求IP地址的设备收到请求后,会向请求设备回复一个ARP响应,包含自己的MAC地址。请求设备收到响应后,将收到的MAC地址与目标IP地址建立映射关系,并将映射结果存储在ARP缓存表中,以便后续使用。
除此之外,lab4对ARP缓存提出了有效时间限制,并且利用超时重发机制保证其可靠性。
Network Interface:
在理解了ARP协议的工作原理之后,NetworkInterface的实现就变得比较清晰了,其结构实现如下:
class NetworkInterface
{
private:
  // Ethernet (known as hardware, network-access, or link-layer) address of the interface
  EthernetAddress ethernet_address_;
  // IP (known as Internet-layer or network-layer) address of the interface
  Address ip_address_;
  // ARP (Address Resolution Protocol) 30-second-valid cache recording a mapping from IP addresses to Ethernet
  // addresses
  std::unordered_map<uint32_t, std::pair<uint64_t, EthernetAddress>> arp_cache_;
  // Ethernet frames ready to be sent, including ARP and IP datagrams
  std::queue<EthernetFrame> frames_;
  // Ethernet frames waiting for the ARP respond
  std::list<std::pair<uint32_t, EthernetFrame>> waiting_frames_;
  // ARP timer recording how long it has been since last request was sent
  std::unordered_map<uint32_t, uint64_t> arp_timer_;

public:
  // ...
};
Sending Datagram:
对于发送接口来说,其工作流程应该如下:
- 检测ARP缓存是否包含目标IP地址且有效;
- 若存在,则直接发送。
- 反之,检测该ARP请求是否近期发送过;
- 若近期发送过,则直接返回,避免网络堵塞;
- 反之,发送ARP请求并重置ARP计时器,最后将该IP数据包暂存。
void NetworkInterface::send_datagram( const InternetDatagram& dgram, const Address& next_hop )
{
  uint32_t next_hop_ip = next_hop.ipv4_numeric();
  // construct Ethernet frame
  EthernetFrame frame;
  frame.header.src = ethernet_address_;
  frame.header.type = EthernetHeader::TYPE_IPv4;
  frame.payload = serialize( dgram );

  if ( arp_cache_.find( next_hop_ip ) == arp_cache_.end()
       || arp_cache_.at( next_hop_ip ).first >= ARP_CACHE_TIMEOUT ) {
    // queue the datagram until knowning the Ethernet address
    waiting_frames_.emplace_back( next_hop_ip, frame );

    // avoid flooding the network with ARP requests
    if ( arp_timer_.find( next_hop_ip ) != arp_timer_.end()
         && arp_timer_.at( next_hop_ip ) <= ARP_REQUEST_TIMEOUT ) {
      return;
    }

    // construct ARP frame
    EthernetFrame arp_frame;
    // ...
    // send the ARP request
    frames_.emplace( arp_frame );
    // update ARP timer
    arp_timer_.emplace( next_hop_ip, 0 );
  } else {
    // send directly if destination is known
    frame.header.dst = arp_cache_.at( next_hop_ip ).second;
    frames_.emplace( frame );
  }
  return;
}
Receiving Frames:
对于接收接口来说,其工作流程应该如下:
- 检测数据帧协议;
- 若为IP,直接解析返回。
- 若为ARP,则检查为ARP请求还是ARP回复;
- 若为ARP请求,则更新ARP缓存,仅当存在查询地址才返回;
- 若为ARP回复,则更新ARP缓存,并
waiting_frames_中已知地址的帧发送。
// frame: the incoming Ethernet frame
optional<InternetDatagram> NetworkInterface::recv_frame( const EthernetFrame& frame )
{
  optional<InternetDatagram> recv_dgram = nullopt;
  switch ( frame.header.type ) {
    case EthernetHeader::TYPE_IPv4: {
      // parse the recv datagram
      // ...
      recv_dgram = dgram;
      break;
    }
    case EthernetHeader::TYPE_ARP: {
      // costruct ARP message
      ARPMessage arp_msg;
      if ( !parse( arp_msg, frame.payload ) ) {
        break;
      }
      switch ( arp_msg.opcode ) {
        // reply ARP request and update ARP cache
        case ARPMessage::OPCODE_REQUEST: {
          // the destination has to be the broadcast address
          if ( frame.header.dst != ETHERNET_BROADCAST ) {
            break;
          }
          // update ARP cache
          arp_cache_.emplace( arp_msg.sender_ip_address, make_pair( 0, arp_msg.sender_ethernet_address ) );

          // reply only if the target IP address is known
          if ( arp_msg.target_ip_address != ip_address_.ipv4_numeric()
               && ( arp_cache_.find( arp_msg.target_ip_address ) == arp_cache_.end()
                    || arp_cache_.at( arp_msg.target_ip_address ).first >= ARP_CACHE_TIMEOUT ) ) {
            break;
          }
          // construct ARP frame
          // ...
          // send the ARP reply
          frames_.emplace( arp_frame );

          break;
        }
        // update ARP cache, ARP timer and waiting frames
        case ARPMessage::OPCODE_REPLY: {
          // the destination has to be the receiver's address
          if ( frame.header.dst != ethernet_address_ ) {
            break;
          }
          arp_cache_.emplace( arp_msg.sender_ip_address, make_pair( 0UL, arp_msg.sender_ethernet_address ) );
          arp_timer_.erase( arp_msg.sender_ip_address );

          // update the waiting frames
          // send the frames in the waiting list, when address is known and valid
          // ...
        }
        default:
          break;
      }
      break;
    }
    default:
      break;
  }

  return recv_dgram;
}
Test Results:
zhytou@LAPTOP-Q0M4I2VQ:~/minnow/build$ make check4
Test project /home/zhytou/minnow/build
    Start  1: compile with bug-checkers
1/2 Test  #1: compile with bug-checkers ........   Passed    0.17 sec
    Start 35: net_interface
2/2 Test #35: net_interface ....................   Passed    0.02 sec

100% tests passed, 0 tests failed out of 2

Total Test time (real) =   0.20 sec
Built target check4
5 The IP Router
Router Data Structure:
lab5要求在lab4NetworkInterface的基础之上实现一个名为Router的路由器类。其中,一个Router管理着一组NetworkInterface接口,每一个接口管理着一个子网,即:和这个子网内的所有设备接口进行通信,且每个接口可以使用不同数据链路层技术,比如、以太网、WIFI和蓝牙等。
此外,Router内部还存储着一组名为路由的跳转规则。它其实是一个IP地址到MAC地址的映射。当路由器接收到需要转发的数据包时,会查询该数据包的目的IP地址,在路由表中找到相应的下一跳地址。
路由表和ARP缓存有什么区别?
第一,路由表映射的是整个网络中的IP地址与下一跳路由器/接口的映射关系,而ARP缓存只映射局域网内主机的IP与MAC地址关系。 第二,路由表主要靠静态设置和路由协议动态学习获得,而ARP缓存通过ARP请求响应在本地网络内学习获得。
因此,Router结构体如下:
class Router
{
  // The router's collection of network interfaces
  std::vector<AsyncNetworkInterface> interfaces_ {};
  // The router's collection of forwarding rules
  std::vector<std::tuple<uint32_t, uint8_t, std::optional<Address>, uint64_t>> routes_ {};
public:
  // ...
};
Forward:
在理解了路由器的工作原理之后,实现转发route函数就很简单了。只需要注意修改TTL和Checksum。
void Router::route()
{
  for ( auto& interface : interfaces_ ) {
    while ( 1 ) {
      optional<InternetDatagram> opt_dgram = interface.maybe_receive();
      // no more datagrams
      if ( !opt_dgram.has_value() ) {
        break;
      }

      InternetDatagram dgram = opt_dgram.value();
      uint32_t dst_addr = dgram.header.dst;
      uint64_t match_idx = routes_.size();
      // iterate through all routes to find the longest prefix match
      for ( uint64_t i = 0; i < routes_.size(); i++ ) {
        uint32_t route_prefix = get<0>( routes_[i] );
        uint8_t prefix_length = get<1>( routes_[i] );
        uint32_t mask = prefix_length == 0 ? 0 : ~( ( 1U << ( 32 - prefix_length ) ) - 1 );
        // ...
      }

      // drop the datagram in the following 2 cases:
      // no matched route
      if ( match_idx == routes_.size() ) {
        continue;
      }
      // TTL is arleady 0 or 0 after derecementing
      if ( dgram.header.ttl == 0 || dgram.header.ttl - 1 == 0 ) {
        continue;
      }
      // decrement the TTL
      dgram.header.ttl -= 1;
      // compute checksum
      dgram.header.compute_checksum();
      // send it to the next hop
      // ...
    }
  }
}
Test Results:
zhytou@LAPTOP-Q0M4I2VQ:~/minnow/build$ make check5
Test project /home/zhytou/minnow/build
    Start  1: compile with bug-checkers
1/3 Test  #1: compile with bug-checkers ........   Passed    2.36 sec
    Start 35: net_interface
2/3 Test #35: net_interface ....................   Passed    0.01 sec
    Start 36: router
3/3 Test #36: router ...........................   Passed    0.03 sec

100% tests passed, 0 tests failed out of 3

Total Test time (real) =   2.40 sec
Built target check5